XR650R Baja 1x Dream Bike Build
(Intro)
No race has more links to the XR650R than the Score Baja series in Mexico. Every year hundreds of crazy desert racers hit the dust to experience all that is the Baja. 'Dust to Glory' is a documentary which gives the viewer an insight into the hardcore desert racing fraternity, and also the legend that is Johnny Campbell. Johnny raced the XR650R in the early part of the naughties until Honda pulled it from their range to introduce the CRF450X.
Johnny's XR was built by Bob Bell and his crew at Precision Concepts and was not too far removed from the stock bike (to the naked eye). In reality they made some key mods to the engine, suspension, intake, braking and exhaust. The stock bike makes around 43hp to the rear wheel, whilst the 1x (the number of the Honda A team bike) bike made a whopping 67hp. The setup was specific to the wide-open riding of the Baja race.
I am not going to go into too much detail as there is plenty on Precision Concepts website that explains the mods, but basically the 1x bike was the ultimate XR650R. It was lean and focused, and also amazingly good looking!
My dream would be to afford to buy an original bike from the race team or from someone who already has, but that is unlikely to happen any time soon. Even if I had the cash, where do you look for one? Living in Australia doesn't help either. There will be a lucky few in the USA who got their hands on the actual thing, and I will forever be envious of them. If I were them I would also hang onto the bike for dear life! One down side though is they are essentially museum pieces now, and riding them would be a crime in my opinion. Where is the fun in having a race bike sat in the garage?!
So you may be wondering what I am getting at, but I want to build a Replica 1x Baja XR650R.
Replica's are hard to build when replicating a 'works' bike as most of the components are a one-off for the race, and the 1x bike is no different. I am going to be realistic about this build and will have to make do with some closely matched components, as well as a few legal bits to make the thing ridable here in Australia (ie. lights, chain guard, indicators, speedo etc.).
The parts list is long and expensive, but the idea is to create as close to original as possible and in turn creating a simply unique XR for Australia and most of the World. Modifying bikes/cars never makes you money, so I don't expect to increase the bikes value much but that's not the ultimate idea here. This build will be done over as long as a year or two as I gather the parts which are harder to find, but keep an eye on my blog and I will keep you up-to-date with my findings and progress!
Long live the King of Baja!!
Saturday 10 November 2012
Saturday 13 October 2012
Front Brake Clean and Bleeding
When buying a new bike it is always a good idea to strip down all the crucial bits to ensure there is nothing that needs attention and also to familiarise yourself with your new bike if you have never worked on that model before.
Because this bike is my daily commute, from day one I have had to do this on the go, allowing only weekend time. This can be tough as the bike needs to be in one piece for Monday morning. However, I am slowly doing one thing at a time and the latest is giving the brakes a service. I suspected that my brakes had not been serviced for a long time, if not since new (year 2000!), and as you will see below, I probably had a case for that suspicion, they were full of gunk!!
My task was to remove, clean and replace the front brake system, including fitting a loaned braided brake hose from my friend Geordie. With the added weight of the Acerbis tank I feel the brake could be beefed up a little and Geordie has had lots of experience with the XR brakes, and just about everything on the XR to be honest, and his verdict on all the available mods (including larger front rotor) was that a good service and a braided hose has the largest improvements. A larger rotor is a good mod but more for very heavy weight addition or road use.
There are many opinions on this but it really comes down to the type of riding you do on your XR.
Special things needed:
Step 1:
 Get a container to catch the old fluid and place it under the calliper. then place a short hose on the bleed nipple and tweak it a quarter turn until fluid comes out, then proceed to pump the brake lever until it stops. Next remove the hose clamp half way up the fork to release the hose. Next remove the calliper hose banjo bolt and place that in the container and pump the lever again. Then you can remove the top banjo where it meets the master cylinder and carefully remove the hose, watching out for more drips from the lower edge.
Note: brake fluid is horrible stuff and can wreck plastics and rubbers etc. so have plenty of rags and/or paper protecting your tank area and floor and brake pads. Contaminated brake pads are as good as useless.
Step 2:
 Carefully remove the calliper from its mountings by undoing the two size 12 bolts, at the same time you can remove the brake pad pin with a flat head screwdriver and remove the brake pads and place in a safe place (or replace if required). Remaining fluid will continue to come out so transport in a rag to avoid spillages. Remove the master cylinder from the handlebars and pour remaining fluid into container.
Step 3:
 Now you can start removing everything that can be removed from the calliper and master cylinder being careful not to damage any seals, pistons etc. The pistons can be removed by using nylon lined pliers to grip the edge and by twisting and pulling they will eventually come out. The master cylinder has a small plastic 'bubble' in it that needs to be removed and cleaned with an aerosol/compressed air as any gunk will most likely be collect in or below this. On Geordies advice I used an acid cleaner to soak and then scrub the major calliper components and the master cylinder. All corners and passages where fluid travels need cleaning until all residue is removed and all parts are clinically clean.

Note: If you suspect your brakes need a full service with master cylinder plunger and pistons and seals needing replacing, this would be a good time to fit them. On this occasion I knew I would have the brakes apart again in a few weeks so will be ordering the service kit before I do.
Step 4:
Reassemble the calliper and master cylinder in the same way you took it apart, leaving the pistons in roughly the right position to allow space to fit the pads and slide back over the rotor. Bolt everything back to the bike excluding the two banjo bolts, but route the hose. The next step is bleeding, and there are various ways this can be done. The XR is a particularly difficult to remove all air from the system so I will describe the method which worked for me, but note there may be better/easier ways depending on the equipment you have.
Step 5:
Tighten the lower banjo bolt on the hose with new copper washers, then fit a clear hose to the bleed nipple and loosen it a quarter or so turn until it is open. Using a syringe full of new Dot 4 fluid, pump fluid into the other end of the clear hose whilst simultaneously holding the upper end of the new hose with a rag, watching for the first signs of fresh fluid coming out the top. Once it does, still holding pressure on the syringe, tighten the bleed nipple again. Then carefully connect the upper end of the hose to the master cylinder with new copper washers.
Step 6:
Now fill the master cylinder about half way and give it a few pumps by hand. If bubbles start to surface from the bottom of the reservoir, continue to pump until these disappear. Chances are though that you will never get all the air out like this so do the following:
Fill the master cylinder and place the seal and cover back on. Now unbolt it from the handlebars again (yes I know it sounds crazy!) and hold it in the air as high as the hose permits. Then starting on the calliper, tap it firmly with something like a screwdriver handle and move your way up the hose as if forcing air up, then tap the master cylinder whilst still holding it up high. you can then pump the lever or push the plunger by hand a few times and do this a few times over.
Now you can bolt the cylinder back onto the handlebars, unscrew the cover and remove the seal. you should notice loads of small air bubbles or one large bubble in the plastic 'bubble' described earlier. continue to pump the lever until these surface and disappear. This will most likely take some time and patience really is needed. As long as you continue to get bubbles you know it is still work in progress! If you have to elevate the cylinder again then so be it.
Eventually the lever will become firm and then you need to make sure no more air is coming up the hose into the cylinder. At this point your brakes are bled and you can replace the seal and cover. Give everything a once over and make sure everything is tight and has been reinstalled.
Now you are ready to test it! If you have any questions regarding this task or anything else XR650R related please email me at travis.cul@gmail.com
Because this bike is my daily commute, from day one I have had to do this on the go, allowing only weekend time. This can be tough as the bike needs to be in one piece for Monday morning. However, I am slowly doing one thing at a time and the latest is giving the brakes a service. I suspected that my brakes had not been serviced for a long time, if not since new (year 2000!), and as you will see below, I probably had a case for that suspicion, they were full of gunk!!
My task was to remove, clean and replace the front brake system, including fitting a loaned braided brake hose from my friend Geordie. With the added weight of the Acerbis tank I feel the brake could be beefed up a little and Geordie has had lots of experience with the XR brakes, and just about everything on the XR to be honest, and his verdict on all the available mods (including larger front rotor) was that a good service and a braided hose has the largest improvements. A larger rotor is a good mod but more for very heavy weight addition or road use.
There are many opinions on this but it really comes down to the type of riding you do on your XR.
Special things needed:
- container
- rags
- clear hose
- one way valve (optional)
- syringe that fits tightly onto clear hose
Step 1:
 Get a container to catch the old fluid and place it under the calliper. then place a short hose on the bleed nipple and tweak it a quarter turn until fluid comes out, then proceed to pump the brake lever until it stops. Next remove the hose clamp half way up the fork to release the hose. Next remove the calliper hose banjo bolt and place that in the container and pump the lever again. Then you can remove the top banjo where it meets the master cylinder and carefully remove the hose, watching out for more drips from the lower edge.
Note: brake fluid is horrible stuff and can wreck plastics and rubbers etc. so have plenty of rags and/or paper protecting your tank area and floor and brake pads. Contaminated brake pads are as good as useless.
Step 2:
 Carefully remove the calliper from its mountings by undoing the two size 12 bolts, at the same time you can remove the brake pad pin with a flat head screwdriver and remove the brake pads and place in a safe place (or replace if required). Remaining fluid will continue to come out so transport in a rag to avoid spillages. Remove the master cylinder from the handlebars and pour remaining fluid into container.
 Step 3:
 Now you can start removing everything that can be removed from the calliper and master cylinder being careful not to damage any seals, pistons etc. The pistons can be removed by using nylon lined pliers to grip the edge and by twisting and pulling they will eventually come out. The master cylinder has a small plastic 'bubble' in it that needs to be removed and cleaned with an aerosol/compressed air as any gunk will most likely be collect in or below this. On Geordies advice I used an acid cleaner to soak and then scrub the major calliper components and the master cylinder. All corners and passages where fluid travels need cleaning until all residue is removed and all parts are clinically clean.
Note: If you suspect your brakes need a full service with master cylinder plunger and pistons and seals needing replacing, this would be a good time to fit them. On this occasion I knew I would have the brakes apart again in a few weeks so will be ordering the service kit before I do.
Step 4:
Reassemble the calliper and master cylinder in the same way you took it apart, leaving the pistons in roughly the right position to allow space to fit the pads and slide back over the rotor. Bolt everything back to the bike excluding the two banjo bolts, but route the hose. The next step is bleeding, and there are various ways this can be done. The XR is a particularly difficult to remove all air from the system so I will describe the method which worked for me, but note there may be better/easier ways depending on the equipment you have.
Step 5:
Tighten the lower banjo bolt on the hose with new copper washers, then fit a clear hose to the bleed nipple and loosen it a quarter or so turn until it is open. Using a syringe full of new Dot 4 fluid, pump fluid into the other end of the clear hose whilst simultaneously holding the upper end of the new hose with a rag, watching for the first signs of fresh fluid coming out the top. Once it does, still holding pressure on the syringe, tighten the bleed nipple again. Then carefully connect the upper end of the hose to the master cylinder with new copper washers.
Step 6:
Now fill the master cylinder about half way and give it a few pumps by hand. If bubbles start to surface from the bottom of the reservoir, continue to pump until these disappear. Chances are though that you will never get all the air out like this so do the following:
Fill the master cylinder and place the seal and cover back on. Now unbolt it from the handlebars again (yes I know it sounds crazy!) and hold it in the air as high as the hose permits. Then starting on the calliper, tap it firmly with something like a screwdriver handle and move your way up the hose as if forcing air up, then tap the master cylinder whilst still holding it up high. you can then pump the lever or push the plunger by hand a few times and do this a few times over.
Now you can bolt the cylinder back onto the handlebars, unscrew the cover and remove the seal. you should notice loads of small air bubbles or one large bubble in the plastic 'bubble' described earlier. continue to pump the lever until these surface and disappear. This will most likely take some time and patience really is needed. As long as you continue to get bubbles you know it is still work in progress! If you have to elevate the cylinder again then so be it.
Eventually the lever will become firm and then you need to make sure no more air is coming up the hose into the cylinder. At this point your brakes are bled and you can replace the seal and cover. Give everything a once over and make sure everything is tight and has been reinstalled.
Now you are ready to test it! If you have any questions regarding this task or anything else XR650R related please email me at travis.cul@gmail.com
Sunday 23 September 2012
Acerbis Sahara L/R fuel tank fitment
The ongoing debate about how much fuel is enough fuel is one which depends entirely on what type of riding you do.
My XR's primary use is to travel 60km to work and back during the week, and then travel the 100km to the 'bush' on the weekend. Once in the bush fuel is not so much an issue as one can just make sure it has the amount of gas needed, and no more.
With a L/R tank addition to a dirt bike the biggest factor becomes weight, and the extra weight of the fuel can adversely affect the handling of the bike. The front end becomes heavy and it is likely to wash more under braking. The front end dips a lot more under braking too. As the location of the fuel tank is quite high up in the COG, it can also make the bike feel a bit more top heavy which if riding mostly slow trails becomes a very tiring factor!
In my case I like riding mostly big wide open dirt roads at high speed, so sort of rallye type riding, which the XR was built for. These Acerbis tanks are great for this type of riding as they aid the standing position by providing a small ledge on either side for your knees to slot into (depending on how tall you are!).
Fitment of these tanks to the XR650R can be a bit tricky especially if you have any other modifications which encroach on the space for the tank. In my case I have the Pro Circuit exhaust header which made my fitment a little tricky, and I will indicate where in my step by step installation below:
Step-by-step:
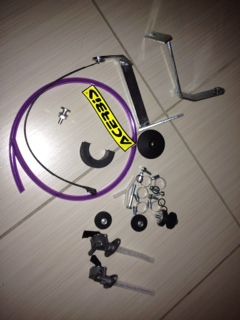
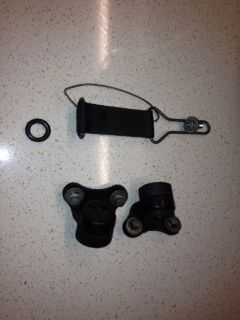
Out the packaging, the Acerbis comes with all the bits for fitment
Two brackets, fuel taps, hose, rubber frame pad, and bolts
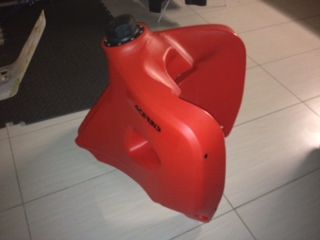
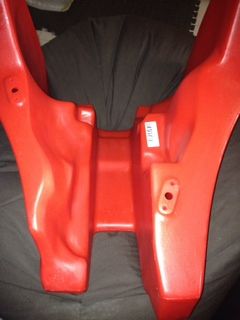
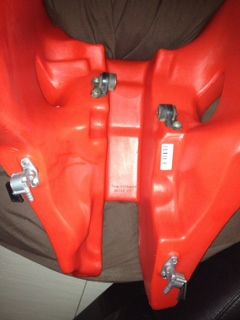
Upside down you can see it has two fuel taps allowing fuel management out of both sides of the tank. Because it drops so low on each side and the taps sit higher than the bottom, there is always a bit of fuel left in the tank that can be utilised by turning the bike on its side when reaching empty which passes the remaining fuel to one side (you need to turn the other tap off too). If you get to this point you really should be thinking about refuelling!!
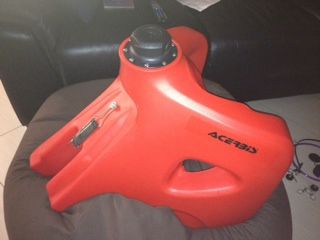
There are some parts that you need to remove from your stock tank and fit to the Acerbis, these are: rubber strap, both under side mounting bushes and in my case the fuel tap washer (I only got one for some reason)
This is how it looks once these items are fitted. I first fitted the rubber frame pad to the top of the frame underneath where the tank sits. It positions nicely just in the recess of where the ignition module is.
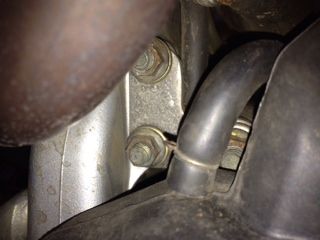
The brackets need to be fitted to either side of the top engine bolt in this photo. In my case the Pro Circuit header did not allow enough space to get any type of spanner onto either end of this bolt, so I had to remove the left side header piece before commencing. Once off it was easy to position the brackets to line up with the new tank holes. You can just keep sitting the tank in place to see where the holes need to line up with. Once the bolt is re-torqued I just made minor adjustments by using pliers to move the brackets.
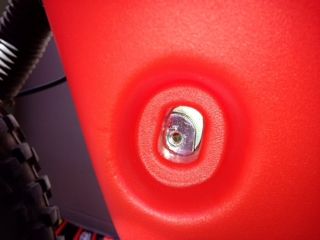
Once the brackets are sorted, you can fit the tank by first lining up the underside bushings (do this first as the left side is paticularly difficult to align if the tank is fixed in place elsewhere!). Be careful not to damage the tank as getting tools to the left side is tricky as the tank design is not perfectly aligned with the bolt.
Next you can fit the strap and then align the lower mounts to the brackets with the supplied bolts and bushes. Minor adjustments can be made using a little force.
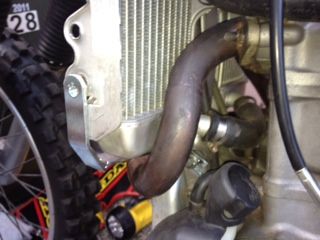
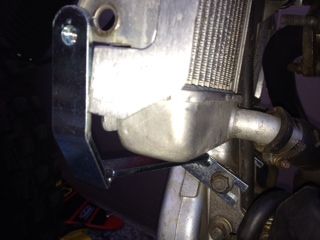
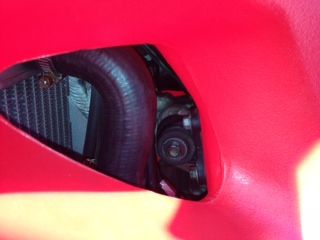
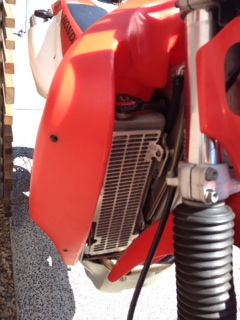
At this point you want to check that nothing is rubbing on the tank, especially in the radiator area as prolonged vibrations can eventually create a hole in your tank where harder items rub. In my case the radiator guards needed some adjustments to make them clear the inside of the tank wings. I did this by bending them slightly with a clamp. Another area you want to check is the indicators and control clearance on full turn left and right. The tank comes up much higher than the stock tank so there are most likely going to be some clearance issues. On mine the indicators bend a little on full turn, but as they are rubber mounted that will have to do for now!
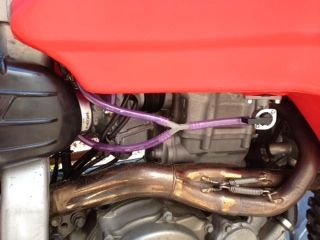
Once the tank is in place, the last thing to do is to install the fuel hose. The hose that comes with the tank is very cheap semi-translucent purple hose which I may replace sometime with a stronger type. As the tank has two fuel taps you need to cut three pieces of hose, which then connect using the supplied Y-piece. There are some supplied hose clamps but I feel that it is overkill as the hose is tight onto the connections and the clamps look a little untidy on the right hand side. I will monitor this and if it becomes obvious that I am leaking out of the joins, I will fit them at a later date.
And...this is how she looks now
I also got supplied with a stock Honda seat cover which I fitted to the bike at the same time. This was just a matter of removing the staples from the black gripper cover I had before, and then re-stapling the new cover onto the existing seat base and foam. There really is nothing tricky with this job, as long as you have a staple gun that is up to the task!
This has been my second fitment of the Acerbis, first time was on a stock XR and this time on a modified XR, and it can safely be said that although some alteration had to be made this time around to make fitment possible, the Acerbis Sahara tank is a nice DIY fitment for anyone who wants to add the range to their XR for those longer trips!!
Bought for $360.00 AUD, The Acerbis Sahara L/R fuel tank is worth its price for the versatility it provides the XR650R with.
Tuesday 11 September 2012
DRC LED fender light insert
 Today I got a chance to fit the DRC LED insert for the standard rear fender on the XR650R. It is advertised here: http://www.wheelingcyclesupply.com/shop/36/24/index.shtml
I found out about this one on an American online forum and it had some good reviews. The customer service was excellent and although it took almost two weeks to arrive in Australia, I feel it was good value at $16 p&p.
The XR comes with no light in the rear fender here in Australia and Europe (stock comes with the ugly rectangular light on the chunky rego plate holder). In the States I believe theirs comes with it working but it is intended only for off road use.

These LED's are super bright, they operate as a tail light and brake light and they plug straight in using the existing AC/DC circuit (no need for resistors etc.). They really are a bolt on unit, as the XR has the holes already in the fender that this uses.
I have wired this in so that I can remove the rego tail light or the LED insert independently, so if I am only dirt riding I can remove the rego plate holder altogether without having to rewire.
My XR had a bit of butchering done on its wiring at some point with a switch fitted for the headlight and a few other add ons like the Vortex ignition module. The long term plan is to totally simplify the wiring layout on the XR by using as few connector blocks as possible but also maintaining an easy disconnect system when I need to remove items. I will eventually purchase connectors like these:

For now though it looks like this until I have saved a little more $$$$
Next mods are still in planning........
Saturday 1 September 2012
Got another BRP!
The Beast is back!
So after three months of looking at just about every bike for sale in Queensland, I had to decide what bike was going to be most useful for day to day commuting as well as for adventure/off-road riding on the weekends. As much as a cruiser, for......well cruising, around the streets of Brisbane is a tantalising prospect, and a big adventure tourer for mile-munching in comfort would make my rear end happy, I could not resist going for another Honda XR650R.
Yes there are newer, more bling bikes in the same class these days, but despite getting close to pulling the trigger on a Husqvarna TE630 and not wanting to fork out $14 000 for the KTM 690 EnduroR, the simple fact of the matter is that none of the latest offerings offer the same package. I don't want to go into much detail here but to summarise:
Pro:
Lightness
Simple reliability
Versatility
Out the box off-road racer
Road capable
Seriously quick
Con:
Kick start only
Needs setting up properly to get full potential
No longer made (but that was due to Honda making no money because they didn't break!)
So this is my second XR650R, the first one I had in the UK but the type of riding really did not suit it there (including a few enduro events). I vowed to buy another one the day I sold it, and out of all the bikes I have owned, the XR provides a riding sensation that stands out.
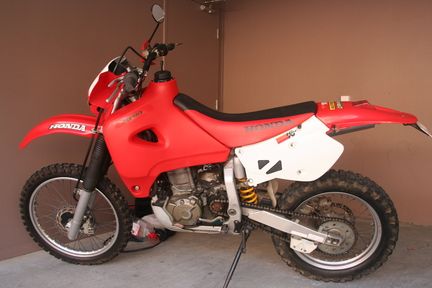
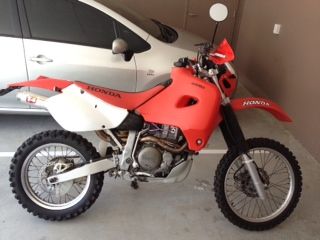
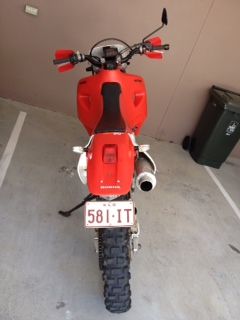
This is a 2000 model with a Pro Circuit exhaust system (very loud), Hot cams stage 1, Vortex CDI programmable Ignition and airbox mod. She runs beautifully and still feels tight with 10 000km on the clock. The oil and filter, coolant, indicators and tail light have been changed since purchasing it.
The plan is to get it looking something like this:

Over the coming months I will be documenting the modification process and also the regular maintenance which will take place regularly with my daily commute helping to rack up the kilometres fast!
So after three months of looking at just about every bike for sale in Queensland, I had to decide what bike was going to be most useful for day to day commuting as well as for adventure/off-road riding on the weekends. As much as a cruiser, for......well cruising, around the streets of Brisbane is a tantalising prospect, and a big adventure tourer for mile-munching in comfort would make my rear end happy, I could not resist going for another Honda XR650R.
Yes there are newer, more bling bikes in the same class these days, but despite getting close to pulling the trigger on a Husqvarna TE630 and not wanting to fork out $14 000 for the KTM 690 EnduroR, the simple fact of the matter is that none of the latest offerings offer the same package. I don't want to go into much detail here but to summarise:
Pro:
Lightness
Simple reliability
Versatility
Out the box off-road racer
Road capable
Seriously quick
Con:
Kick start only
Needs setting up properly to get full potential
No longer made (but that was due to Honda making no money because they didn't break!)
So this is my second XR650R, the first one I had in the UK but the type of riding really did not suit it there (including a few enduro events). I vowed to buy another one the day I sold it, and out of all the bikes I have owned, the XR provides a riding sensation that stands out.
This is a 2000 model with a Pro Circuit exhaust system (very loud), Hot cams stage 1, Vortex CDI programmable Ignition and airbox mod. She runs beautifully and still feels tight with 10 000km on the clock. The oil and filter, coolant, indicators and tail light have been changed since purchasing it.
The plan is to get it looking something like this:

Over the coming months I will be documenting the modification process and also the regular maintenance which will take place regularly with my daily commute helping to rack up the kilometres fast!
Subscribe to:
Posts (Atom)


