Monday 30 June 2014

XR650R Baja 1x Dream Bike Build (Finished)

Finally I have found time to upload the images of the finished bike.  I have since ridden it off-road so it will never be an clean again but wow what a machine!  Enjoy the photos and also please see the video at the bottom I took riding it for the first time:


Friday 25 April 2014

XR650R Baja 1x Dream Bike Build (Engine Start)

So after a few frustrating weeks with non-arriving parts orders and re-orders etc. etc. I finally decided to make do with what I had to at least get the engine fired up again.  If only to hear what the Batwing-Race Pipe-Hotcam combo sounds like!

Here is a short video of the first start, apologies for the poor quality:


Wednesday 19 February 2014

Rare Johnny Campbell pics aboard the 1x Honda XR650R

Johnny Campbell beside the beast that is the XR650R:


Johnny powering out of a corner:


Poetry in motion:

The Team Honda Garage pre-race:


Tucked tight and charging (not so easy when you are 6' tall!):


Sunday 12 January 2014

XR650R Baja 1x Dream Bike Build (Plastics & Decals)

Another major update in the build is the plastics and stickers/decals.  I got rid of all my old plastics bar the front fender which was passable as new.  Despite all the cleaning and polishing of just about every piece of the bike and motor, it would be massively detrimental to have less than perfect plastics (ie. tank, shrouds, side covers, rear fender, headlight fender, rear wheel mud flap and radiator guards).  The IMS tank, as mentioned in the last update, came from Mike Childress's father in the States.  It is the white/clear dry break 3.2 gallon from IMS and the dry-break race filler cap came from Ebay in the States.  I still need the breather hose and cap cover to complete the tank.

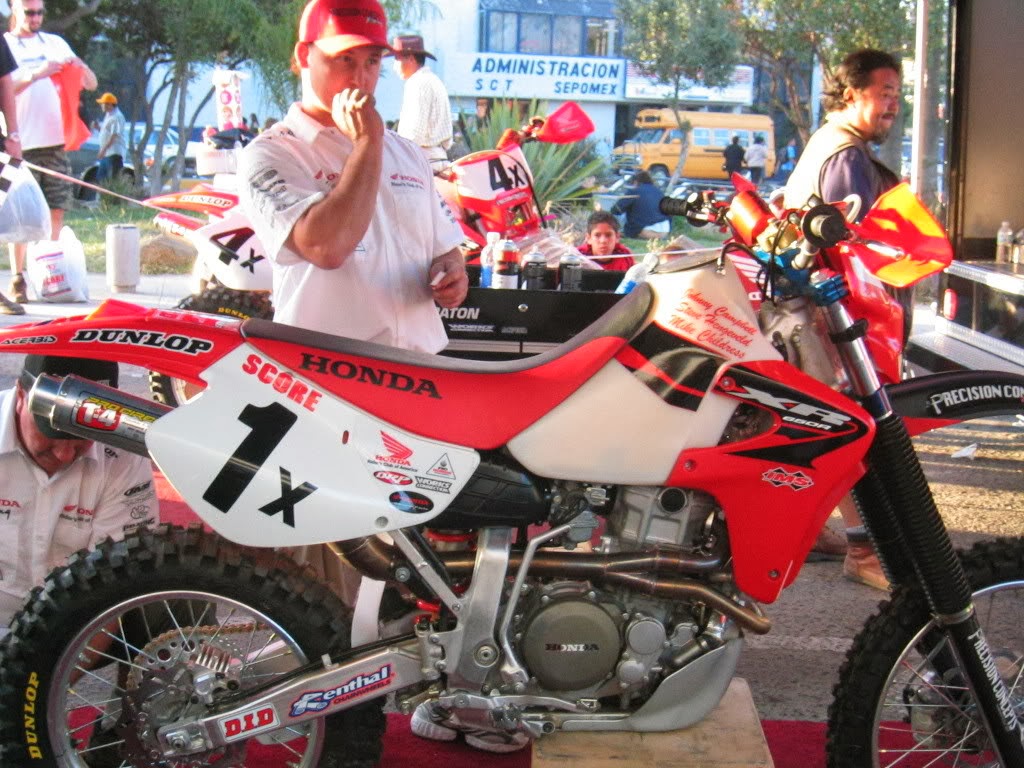
Here is the original bike as a reference:


So the first thing to do was order everything new from the states.  These arrived some time ago but I was reluctant to have the plastics exposed to the dust of my garage until the bike was nearly done.  I had to also find the decals.

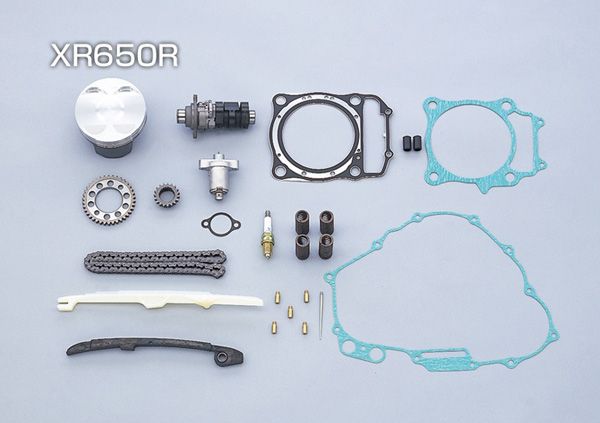
The parts and plastics begin to arrive!

The initial decals fitted to brand new plastics, still waiting for the tank to arrive from the US
Light fender from the US (the Aussie spec one is different), IMS tank dry-break cap and carbon fork guards

Believe it or not the hardest to locate components of this build were the graphics/decals! So here is where I got each one:
  • IMS radiator shroud logos - Precision Concepts (PC)
  • White side-covers incl. airbox cover - PC
  • Rear fender multi logos - (paticularly tricky to find, finally found non-identical ones at a Ballard's Off-raod here in Australia, who just happened to have one lying about from years ago)
  • Handguard Honda wings - PC
  • Handguard Renthals - Ebay
  • Swingarm D.I.D and Renthal combined - PC, also on Ebay
  • Front mudguard (under side) 1x International Johnny Campbell - PC
  • Front mudguard Precision Concepts each side - PC
  • Fork stickers - PC

It may seem like a simple task of calling Diane at Precision Concepts but I can assure you it was no where near that simple. At first I was told that there were none left, but after some more searching and some help from inmate from Advrider, BUMP who knows Diane well and visits their store I was lucky, Diane found a few more left overs. As far as I know there really are none left now, but who knows?!

The rear guard decal, which is a custom made three piece sheet had me about to give up and get some made by a custom graphics company. I contacted both Custom Decals and FX (who both made graphics for the 1x bike), but they both no longer have the designs.  But I struck it lucky seeing a nearly exact decal set for sale on Facebook with Australian company 'Ballards Off-road'.  There is less colour and a couple different logos but for now it will do.

I thought it was a good idea therefore to scan all the decals for future replacements. I have quality scans of each decal, which can then be enhanced and printed as needs be. 

In saying this I have not yet got the 1x number decals (easily made), the 'Score' sticker (widely available) and the fork 'Precision Concept' stickers which have been very difficult to get hold of, even after trying PC directly.  So if anyone has any please get in touch :)

Well now it's time for some eye-candy:

So here is the latest photo of the bike with plastics temporarily fitted!
Beautiful curves - Rear stickers not identical but near enough perfect
Looking real - the bike is starting to resemble a motorcycle again at last!
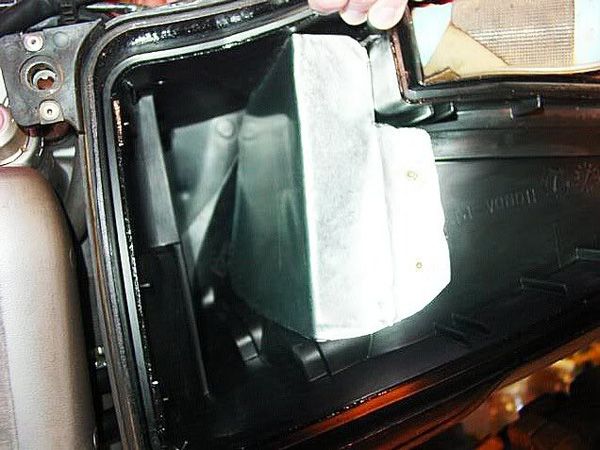
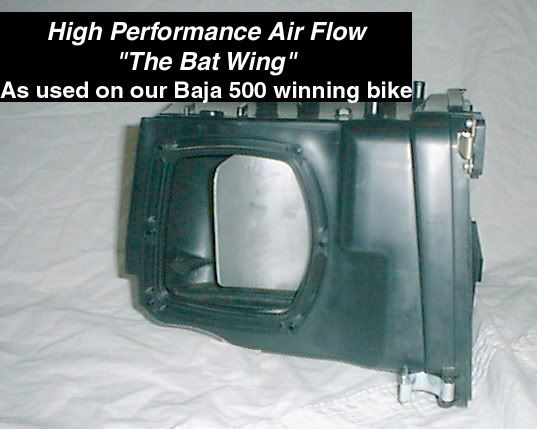
For more on the side cover please see my 'batwing and airbox' post.  Although the bike is looking nearly done, there is a lot of work behind the plastics that still needs doing but the good news is it looks better than even I had hoped!  It just shows that working on each piece at a time and settling for nothing less than reasonably perfect eventually results in what you see above.  This build has taught me a few lessons for sure.

Saturday 11 January 2014

XR650R Baja 1x Dream Bike Build (Batwing & Airbox)


The 'Batwing'

There are many myths and opinions on the Bat Wing that was developed by Precision Concepts and Bob Bell, and I have found many approaches to re-creating the design. My first step was to contact PC and find out if they had any of the Bat Wings lying about and this was their reply:

"Jonah Street came up with that. I wish that we would have saved one as a template, but we didn't. Diane"

So, I began my search for the best approach. Put simply the Bat Wing was a piece of aluminium fixed inside the air box to smooth out the airflow into the throat of the carb. Bob and his team quickly noticed from the first prototype race bike that the XR650R air box is one of the worst designs for a race air intake. The aim of an air box is to filter and provide enough air to feed the fuel ratio at any RPM, and in a racing bikes case that needs to be at its optimum at high RPM, when the bike needs the most air at once.

Something had to be done and Jonah Street along with some aerospace input came up with one or both of the following designs (since posting this I was made aware by Mung that the second design is an original so I will find out more before confirming one or the other) to smooth the airflow:


This first design looks easier than it may seem to make. You have to bend and twist the aluminium in several directions and it is important that you seal it around the edges to prevent air getting past. The throat bend is quite short too. This design is unlike any other attempts I have seen. The second is simpler to make as it just bolts top and bottom and sits in the middle of the air box.

Here is an attempt made by another owner:

I had already begun to make my own Bat Wing when I found the original photos of the Baja bike's Bat Wing so I contacted fellow inmate Burpsa about his attempt and he kindly gave me a pdf template of his design plus some info on where he felt it could improve. One area being the throat which I then looked at making longer so that it goes right up towards the carb.

Here is my attempt in pictures:
First I made a template out of 0.6mm aluminium as it is easier to cut and shape
Initial template with shorter throat

Note the much longer throat, the challenge was going to be how to keep it from flapping
Rough template cut 

I then made a few tweaks here and there to get it fitting right and then cut the 1mm aluminium into shape, and this is what it looks like
Initial fitment before smoothing edges

Throat view

Side/inlet view

I also polished the aluminium surface to make it super smooth. The theory with this design is that it channels most of the air to the left of the Bat Wing and doesn't reduce the volume of the air box for lower RPM use. Coupled with the HRC spec air box cutout it should be effective at getting most of the air to the intake as smoothly and directly as possible.

As the bike is still being built I have not been able to test it, but with my aerospace experience in the air force and a bit of practical theory, I can see it doing a pretty good job. One of the myths has been a 'massive power gain' but this is optimistic in my opinion. For most normal trail riders this Bat Wing may not be too noticeable. I suspect that with the correct exhaust system (T4 Megaphone type) it aids overall air flow and therefore helps the engine cycle by making air more easily available at a certain RPM.

The throat feels solid so hopefully it won't flap once air starts passing over it. I will be making the 'original' design too and then try both side-by-side and decide on the best for my bike.

Any questions/ideas please fire away 


Airbox mod

The other aspect of the air box modifications is the very popular side cover cut out.  I could have bought the XR's Only version side cover which already has their own vent kit already fitted, but I fancied using a OEM side cover but theirs use the UFO replica which is not quite the same as OEM.

The kit comes with instruction but it is basically a matter of cutting the vents to fit the mesh they provide and then drill each rivet in so that the mesh is mounted to the inside of the cut outs.  I used a Dremel as it is very precise and has a good attachment for providing a very clean finish with no fraying.

The only difficulty I had was firstly positioning the cut outs either side of a fin on the inside which keeps the air filter in place.  I used an LED pencil torch in a dark room to Prestik the mesh frames into place and then shining the light through the plastic so I could mark where to cut on the outside.  (I have to admit that my wife came up with the torch idea, and it worked brilliantly!)

Finishing off the cut out with a Dremel

One done and the other ready to be turned over and the mesh fitted


Then drill out each rivet hole from the back through the frames (note the plastic fin which had to be avoided as it holds the filter in place)

The finished product with original sticker fitted

I was quite impressed with the way it came out.  I will be needing to do another one so that I have a spare as they may stop making the kit soon.  There is a slightly larger gap in between the two cut outs than the original bike had but that was unavoidable if I wanted to keep the plastic air filter fin.  If you would like to see the finished product please see my next 'Update 3' which will show the current state of the bike with it fitted...


XR650R Baja 1x Dream Bike Build (The Motor)

The 1x XR650R had many different configurations tried by Bob Bell and Honda and it is almost impossible to know exactly what the 2005 Baja 1000 winning bike had going on inside the motor. 

From my research I have ascertained that some amount of porting and polishing was done on the internals of the head, they fitted the HRC kit pictured below, minus the high compression piston (apparently to reduce power slightly as they were struggling with traction). There were air intake mods like the HRC airbox cover mod and something called a 'Bat Wing' which was an aluminium scoop inside the air box to smooth air flow into the carb. They also had the CDI tweaked to increase the rev limiter and produce better characteristics for desert racing.

Bad news is the motor is one area that I didn't modify internally from my already modified but sad looking XRR motor:


There are a few reasons for this. Firstly I can't find an HRC kit, they were discontinued years ago, secondly my motor already has a Stage 1 Hotcams and Vortex programmable CDI fitted and I feel that it already has the punch to make this bike a scream to ride and it was done not long ago. 

I will however be adding a Pro Circuit reverse megaphone race exhaust system and the Bat Wing mod to make it closer to the original 1x bike. If I come across an HRC kit one day, I will jump on it and do the motor justice by fitting it, but for now I am being realistic and moving on.


Now, the other aspect of the motor is how it looks. As you can see my poor old XR had a tired looking motor and it needed some freshening up. I started by removing it


I blanked everything off and used a solution of aluminium cleaner and water to scrub the casings all over. After many hours it came up looking as fresh as a new one! As with the rest of the bike I also removed visible bolts one at a time and polished them with my Dremel 
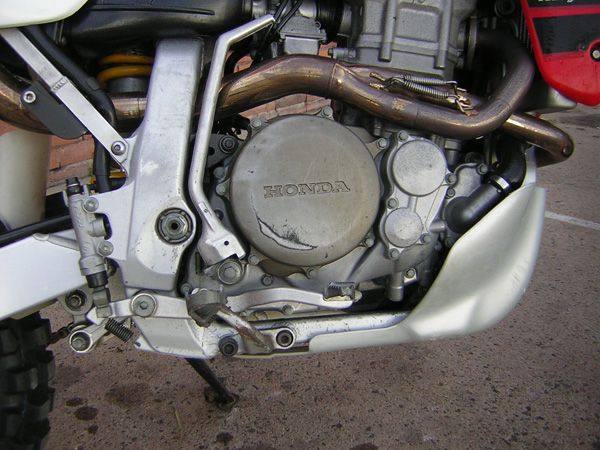
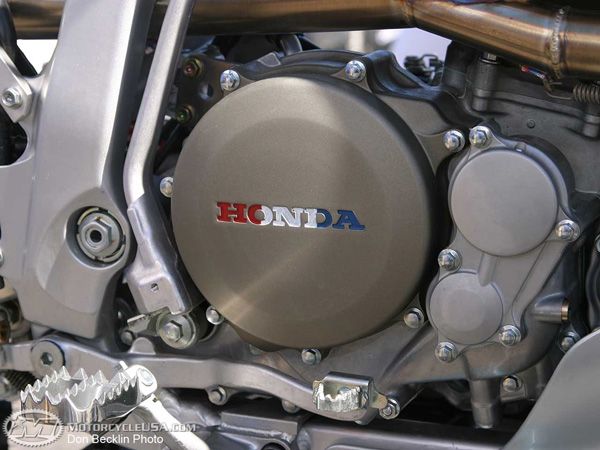
. I also got new clutch and stator covers which makes a big difference visually!

And here is the finished product:


And here is a Precision Concepts motor (not the 1x but similar):


I will write about the air intake/batwing mods in a subsequent post for anyone interested!

XR650R Baja 1x Dream Bike Build (Rear Suspension)

The rear shock used on the original bike was a Precision Concepts hybrid of a CR500 upper and XR650R lower. Two way postage to PC in the states would have made it a very expensive choice for the build so I picked a local suspension shop that has experience building these hybrid combinations for the big XR and gave them a specific brief to not only get it as close to being the real thing, but also looking like the real thing 

The hybrid shock ready to fit

So the red anodized bit is the 'high-speed' adjuster on the CR500 part of the shock. 
'high speed adjuster'

The benefits of the hybrid shock are:
  • larger shock body with more oil, better for cooling and less fade when hot
  • High speed adjuster for desert racing
  • Slightly longer stroke, meaning a raised rear end to the bike

The original had a titanium red spring, which I could not find so David at Suspension Matters found the correct non-titanium spring for my weight and got it powder-coated that Ferrari red to match the race bike. The internals of the original are largely unknown as Bob Bell and his team kept the internal mods on the low down. I am sure Adv inmate BUMP will know more as he has had a lot of contact with the Precision Concept guys over the years the XRR was raced. I however had to choose the best parts available to me, so I went with a revalve and a race tech Gold Valve along with a total overhaul of the seals on the CR500 body.

New bump stop and red spring
Fitted to the bike with 'Bob Bell' sticker

I hope you will agree that it looks like the real thing and David over at Suspension Matters did an awesome job given my crazy requests!